
Blog 3 mins reading time
Keycloak Starter Guide (Part 1/3)

Introduction
This guide provides step-by-step instructions for starting a Keycloak instance using Docker and applying configuration files using Keycloak Config CLI. Keycloak Config CLI allows for declarative configuration management, meaning you define your desired Keycloak setup in configuration files, and the tool ensures Keycloak matches that setup. This approach ensures a repeatable, automated, and version-controllable setup process.
Prerequisites
-
Docker installed on your machine.
-
Java (JDK 11 or later) installed for running Keycloak Config CLI.
-
A prepared JSON configuration file for Keycloak. This guide will use JSON for consistency. The location of this file should be known, as you will use it in the import command.
Step 1: Start the Keycloak Instance
To launch Keycloak on your local machine, run the following Docker command:

Explanation of the Command:
- -d: Runs the container in detached mode (in the background).
- –name keycloak: Assigns a name to the container for easier management.
- -e KEYCLOAK_ADMIN=admin: Sets the administrator username to admin.
- -e KEYCLOAK_ADMIN_PASSWORD=admin: Sets the administrator password to admin. Important: For production environments, use a strong, unique password.
- -p 8080:8080: Maps the container’s port 8080 to your local machine’s port 8080. This makes Keycloak accessible at http://localhost:8080.
- quay.io/keycloak/keycloak:25.0.1 start-dev: Specifies the Keycloak Docker image to use (version 25.0.1) and starts it in development mode.\
Important: The version of Keycloak Config CLI you use should be compatible with the Keycloak server version (25.0.1 in this case). Check the Keycloak Config CLI documentation for compatibility information.
Once the container is running, you can access Keycloak at:
Step 2: Prepare the Configuration File
Create a JSON file named my-keycloak-config.json and save it in the folder ./configs with the following example content:

This simple configuration creates a realm named myrealm and enables it.
Step 3: Apply the Configuration Using Keycloak Config CLI
To import the configuration into Keycloak, you first need to download Keycloak Config CLI.
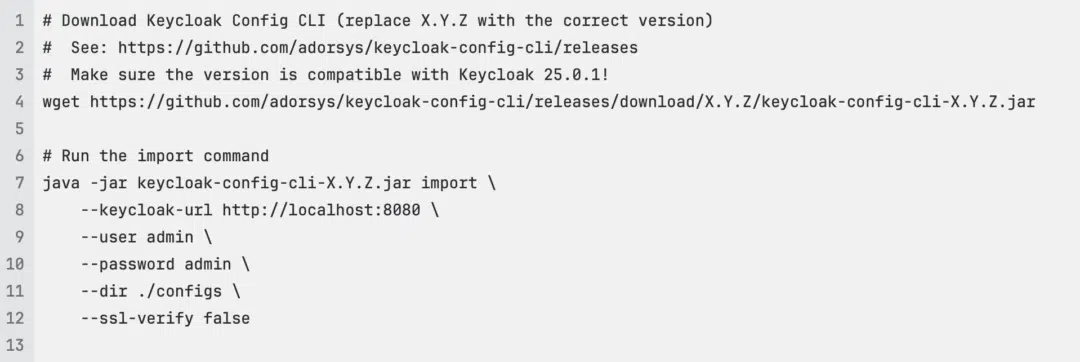
Explanation of the Command:
- java -jar keycloak-config-cli-X.Y.Z.jar import: Runs the Keycloak Config CLI import command. Remember to replace X.Y.Z with the actual version number you downloaded.
- –keycloak-url http://localhost:8080: Specifies the Keycloak server URL.
- –user admin: Specifies the Keycloak administrator username.
- –-password admin: Specifies the Keycloak administrator password.
- –dir ./configs: Specifies the directory containing your Keycloak configuration files.
- –ssl-verify false: Disables SSL certificate verification. This is necessary for local development with the default Keycloak setup.
Security Note: The –ssl-verify false option disables SSL certificate verification. This is acceptable for local development, but never use this in a production environment. In production, you should always use a valid SSL certificate and keep –ssl-verify set to true.
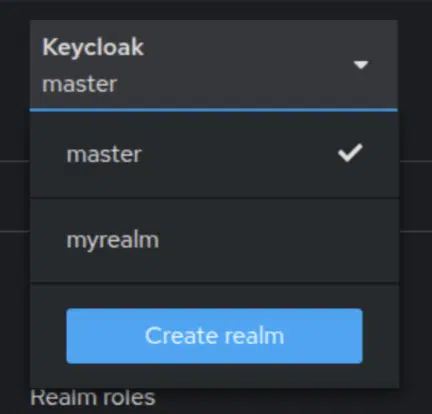
Step 4: Verify the Imported Configuration
Log in to the Keycloak Admin Console at http://localhost:8080. Use the username admin and password admin.
You should see the myrealm realm listed. If you see it, the configuration was imported successfully.
 Conclusion
 Conclusion
Following these steps, you can start a Keycloak instance and efficiently configure it using the Keycloak Config CLI. This method ensures a streamlined, automated, and version-controllable setup process for managing Keycloak configurations. You can now store your Keycloak configuration in a version control system like Git. This is the foundation for the following articles, which will explore more advanced configuration options.
Keen to explore how adorsys can guide your company through technology innovation? Reach out to us here, our team will be delighted to discuss tailored solutions for your organisation.
Written by Victoire Motouom, Fullstack Developer at adorsys Cameroon.